Showing posts with label Plantin Schoolbook. Show all posts

Thursday, April 30, 2009

Box Similar to Sizzix #2 box, Made with my Cricut Design Studio

Here it is... the box I've promised all of you.... I got the box from my dear friend, Wini at Easter. I took her box apart, and basically created one of my own using the DS program. The bottom part of the box I created differs from the one that Sizzix sells, but nonetheless, it pretty much looks the same....

I made 2 designs, 1 using George, and the other using Plantin.


This is the 1st project I created using my Cricut cut of this box. I made this for my friend Tiffany, who is getting married next month.... I made them as favors....

Read More....


Here's another creation using the same cut, and HK cartridge! I have this sample featured at J's Knicknacks.


Download Cut File Here

Wednesday, April 8, 2009

Namebook for MEGAN

Someone was looking for a name book for "Megan" on Cricut's community board this morning. Thought I'd make a few, so she could chose the one she likes the most, just for the fun of it. Cartridge that I used for each name book is listed below each image.


Used: Plantin

Download MEGAN - Plantin Namebook Here


Used: Mickey Font

Download MEGAN - Mickey Font Here


Used: Alphalicious and George

Download MEGAN - Alphalicious & George Here

Tuesday, April 7, 2009

"Hello" Card


For the "hello" I used Plantin Schoolbook.

Read More...

Hello Kitty Head - With George & Plantin Cartridges


Hey There... here is a Hello Kitty cut that I've created, and I've made them on 2 different cartridges. The 1st page on the sheet when you open it up is for George, the 2nd page is for Plantin Schoolbook. I made this while waiting for Ms. Kitty to made her Cricut Cartridge debut.

Cartridges Used:
  • Geroge (1st Page)
  • Plantin Schoolbook (2nd Page)
Download Hello Kitty Cut File Here

Read More....

Sunday, September 7, 2008

Hawaii Title with Palm Trees for SB Page


Here is a Hawaii title for a scrapbook page. This would make great use for those that have vacationed here in Hawaii, or for album covers....
File includes 3 rainbow arches (see pieced together photo below).

Cartridges used:
  • George
  • Doodlebug
  • Plantin Schoolbook

Download Hawaii Title with Palm Trees and Rainbow Arches

Here is what my cut looks like on card stock and pieced together with the rainbow arches:

I am also selling the cuts for those that don't own a Cricut. Click here if you'd like to get your hands on these.

If you have any requests, please feel free to contact me at littlecs7@gmail.com, and I will try my best to create a cut for you. =0)

Thanks for peeking in...

Aloha,
Jen

Saturday, September 6, 2008

My Bead Box


Hey All,

Here is a SU! tin box that I altered and prettied up to use as my bead box. The word "beads" were created and cut on my Cricut Expression. I forgot to save the file for this - so sorry, I don't have one for you to upload. If you do however want me to recreate it, just let me know. I then took some beads and embellished parts of me lettering with them. I used my tombow liquid glue (green n' white) to adhere the wording to my tin box. The DP that I used here is from 3 Bugs' Color Me Pink collection.


Have a great weekend!!
Jen

Saturday, August 30, 2008

Personalized Notebook For Sarah....

Hey All...

I made a composition book all purdied up for my girlfriend's daughter, who celebrated her birthday this past Tuesday. Flowers are Prima Flowers that I received. I haven't posted them on LC's yet - but will SOON!!!! DP is from TAC, and the name "Sarah" was made using the Cricut Design Studio (welding each letter together), and then cut with my Cricut Expression machine. I love this machine, and am happy that I am making use of it a lot now. With the use of my computer, it makes it that much more fun!!!! I used my black fine pointed pen to make the doodles on the letters. Sealed in the notebook with decoupage or modge podge (you can get it at your local craft store), here on Oahu, you can find it cheapest at Walmart - and for $2-$3 more, you can get it at Hawaiian Graphics....LOL!!!!

Anyways - if you want to order a personalized notebook for yourself or someone special - I am taking orders. You can order them from me here: Little C's.

Have a Happy Cuttin' Day!!!

Jen

Friday, August 29, 2008

Shaker Card Tutorial

Hey There.... this posting was taken from my Pieces of Me blog. It is a tutorial on how to create a shaker card. I used the Cricut to make my shaker, so thought this would be great to move over to this blog. Enjoy!!!


Hi All... I made a shaker card for a 1st birthday party we attended today, and did a tutorial on it. Here is a photo of the completed card, when you shake it, the beads that is inside the "1" will move back n' forth. So, here's how I made it....

Suuplies: I used my Cricut Expression and Design Studio to help me create this card. You will also need a sheet of acetate, and some dimensional double stick tape, you could use 3M or other striped type of foam double stick tape. You will need beads to create the "shake" in your card. I used SU!'s bright beads - not sure if they are extincted or not. Rubber stamp images to decorate your card, and stamps for sentiments.

Ok, so I set up my Cricut, only using the size of what I would like my card to be - which is 4-1/4" x 5-1/2". I load it into my Cricut.
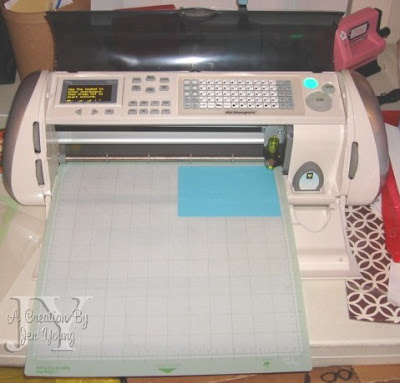


Using the Design Studio program, I know exactly where I am going to cut my "1" at, I just need to make sure that I do not go beyond the measurements of my card. I used the cartridge Alphalicious for this project. I then cut the # out - thus creating a window for my project.


Here is the cut out that I did with the Cricut.

Now, for acetate - I am using the flat part of a TAC plastic stamp container. I have been saving these ever since I've signed up with TAC, and now these are one of the ways I can use them. Cut out the flat part, and use as a window for my shaker card creations.

After I cut out the flat part of the plastic stamp container, I adhere it to the back of the card. Make sure it is secured and it will not move. I used my ATG tape. =0)
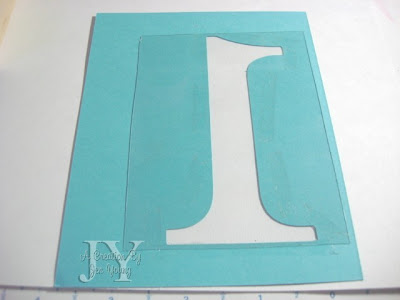

Apply double stick foam tape around the perimeter of the window, be sure to make sure all edges of double stick tape are touching, and enclosing a little section - as this is the area where the beads will be contained.
Now apply double stick foam tape on the edges of your card stock (use the same ones, because if you use another type, the thickness of the difference in tape will throw off the project).

Peel off protective covering of tape (it's easier to peel protective layer off before adding the beads, to lessen the amount of beads bouncing out of the barriers. Add the amount of beads you would like to within the enclosed barriers of the double stick foam tape. I am using this mini spoon that you could collect from 31 Ice Cream (go and ask for some samples, and keep the spoons for free) - or you can purchase them from your LCS (Local Craft Store) for about $5 for 10. Push in any stray beads that stick to the foam tape. Don't RUSH!!!
Spread beads out, if beads are on top of each other, sealing the card will be a problem. Make sure all beads are leveled, and not piled on top of each other.

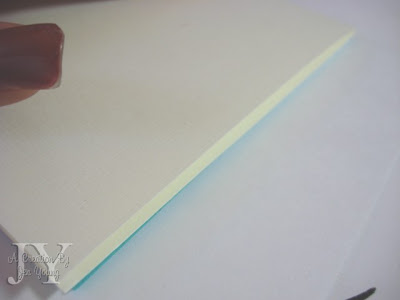
Take a card base, that you will place right on top of your shaker creation, lining it up with the edges (you can see a tint of blue right where I lined up my card). The sticky of the double stick foam tape will adhere the card stock to the card base.
Flip over, decorate with other stamp images (I used the AL stamp set that I got from my girlfriend Cheryl - thanks chickie!!!), I then cut out the images, and placed where I wanted them to go. Stamped the sentiment directly onto the card. Now shake around, and see those beads move up n' down.
Hope you likes this tutorial, and you'd get a chance to make one of your own. Let me know - I would love to see it!!

Aloha and have a great weekend!!!
Jen


Click Here To Go To ALL My Shared Cut Files:
Design Studio Cuts (.Cut), Gypsy Cuts (.gypsy), Sure Cuts A Lot Cuts (.scut), SVG Cuts (.svg)